Bleed and Margin
Make sure your files are print-ready
When preparing your book files for printing, paying close attention to the details of bleeds, margins, and safe areas is crucial to ensure your final product looks just how you envision it. At PufferPrint, we put together this guide to help you quickly understand these important concepts. Getting bleed and margin right ensures that your files are ready for print without additional rounds of edits and that your final product is polished and professional.
Here’s an expanded look at how to set up your files correctly.
Bleed: Extending Your Artwork

“Bleed” is the area of your artwork that extends beyond the trim line of your page. This extra space ensures that when the pages are trimmed to size, there are no unprinted edges.
Required Bleed: 3mm (1/8″) on all outer edges
At PufferPrint, we require a 3mm (1/8″) bleed on all outside edges of your pages and spreads. This allows for slight variations in the cutting process, ensuring that your design or background color reaches the edge of the final printed page without any unwanted white borders.
Margins: Keeping Important Elements Safe
“Margins” are the space between the edge of the page (the trim line) and where the main content starts. This area acts as a buffer zone, preventing important elements like text and images from getting too close to the edge and potentially being trimmed off.
Minimum Margin Requirement: 3mm (1/8″) from all trim lines
We require a 3mm (1/8″) margin from all trim lines. This margin helps keep your content safe from being partially trimmed off during the trimming process.
Recommended Margin: 6mm (1/4″) from all trim lines
While 3mm is the minimum required margin, we recommend 6mm (1/4″) of margin from the trim line to make making your artwork and text look balanced and professional
Gutter Margins for Different Binding Methods

When designing your book, it’s important to consider the type of binding you’ll use, as this influences how much margin you should leave around the “gutter” (the inner fold where the pages meet). While artwork can and often does cross the gutter of a spread, you don’t really want text or other critical elements there. We have specific margin recommendations for various binding methods to ensure your content remains readable and visually appealing.
For hardcover books, board books, sewn perfect bound softcover books, and saddle-stitched books we recommend a 6mm (1/4″) margin on each side of the gutter. These binding methods are designed to lay flat or nearly flat when opened, which minimizes the need for a larger margin. The smaller margin ensures that your content is well-positioned without wasting valuable space, making it ideal for books that feature large images, illustrations, or layouts that span across both pages.
For traditional perfect bound books (typically softcover books printed on uncoated offset paper) we recommend a larger 15mm (0.6″) margin from the binding edge. This larger margin accounts for the nature of perfect binding, where individual sheets—rather than Smyth-sewn signatures—are glued directly into the spine.
Perfect bound books do not lay flat when opened and tend to curve towards the spine, which can cause text or images placed too close to the gutter to become difficult to read or even disappear into the spine. By leaving a 15mm (0.6″) margin, you ensure that all text and important design elements remain visible to the reader
For wire-o and spiral bound books we recommend a 15mm (0.6″) margin from the binding edge. This margin accounts for the holes that will be punched through your pages during the binding process.
| Book Construction | Recommended Margin on Binding Edge (Gutter) | Recommended Margin on Outer Edges | Required Margin on Outer Edges |
|---|---|---|---|
| Hardcover (Casebound) | 6mm (0.25″) | 6mm (0.25″) | 3mm (0.125″) |
| Board Book | 6mm (0.25″) | 6mm (0.25″) | 3mm (0.125″) |
| Sewn Perfect Bound Softcover | 9mm (0.375″) | 6mm (0.25″) | 3mm (0.125″) |
| Traditional Perfect Bound Softcover | 15mm (0.6″) | 6mm (0.25″) | 3mm (0.125″) |
| Saddle-Stitched Softcover | 6mm (0.25″) | 6mm (0.25″) | 3mm (0.125″) |
| Wire-O | 15mm (0.6″) | 6mm (0.25″) | 3mm (0.125″) |
| Spiral Bound | 15mm (0.6″) | 6mm (0.25″) | 3mm (0.125″) |
Safe Area: Protecting Your Critical Elements
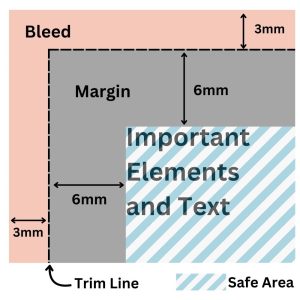
The area inside the margins is often referred to as the “Safe Area”. The safe area is the part of the page where you should place all essential content, such as text and critical design elements, to ensure they aren’t partially cut off during the trimming process or lost in the gutter.
Since the bleed area is 3mm (1/8″) and the recommended margin is 6mm (1/4″) then placing all text and important elements a minimum of 9mm (3/8″) from the outer edges of your file ensures that they are in the “Safe Area”.
Dielines: A Blueprint for Perfect Printing

To help you format your print files correctly, PufferPrint provides custom dielines based on your project’s exact specifications. A dieline is essentially a blueprint that outlines the exact dimensions of your book’s interior spreads and covers, including the bleed areas. Our custom dielines are an important tool for ensuring that your digital files translate into the physical book that you’ve envisioned.
When you receive your custom dielines from us, you’ll see a detailed guide that shows where the trim lines and bleed areas are located. This ensures that your design fits perfectly within the required dimensions, helping to prevent any surprises during the printing and trimming process.
By following the dieline, you can confidently position your artwork, text, and other elements to maintain the integrity of your design and create a bookstore-quality product.
Best Practices for Setting Up Your Files
- Extend Artwork Through the Bleed Area: Ensure that any background colors, illustrations, and designs extend past the trim line and across the entire bleed area. This guarantees that your artwork will reach all the way to the edge of the page after trimming.
- Pay Attention to Your Margins: Remember to pace additional margin between the trim line and your text and important elements. This ensures that nothing critical to your story is trimmed off and gives your book a balanced professsional look.
- Keep Text and Critical Elements Within the Safe Area: All text, logos, and key visuals should be positioned within the safe area, keeping them well away from the edges and ensuring they remain intact.
- Check Your File Setup: Before you start laying out your book, make sure that your bleed, margin, and safe area guidelines are correctly configured in your design software. Taking this extra step early on can streamline the pre-print process, reducing the likelihood of needing to submit multiple revisions of your print files.
By following these guidelines, you’ll ensure your book looks professional and is free of common printing issues like unwanted borders or cut-off text.
At PufferPrint, we’re dedicated to supporting you every step of the way, from file setup to the final print run. We hope this guide has boosted your confidence in formatting your own print files. However, if you’d prefer some assistance, our experienced print formatting team is ready to handle everything for you. Check out our book formatting service to take your project from concept to a polished, print-ready book that you’ll love.
Up Next: Print File Resolution >>
Ready to Print?
When you’re ready to take the next step, share your print-ready files with [email protected] via Google Drive, Dropbox, or WeTransfer
Our pre-print team will review your files and provide any additional feedback to ensure your project turns out just the way you envisioned.
With PufferPrint, you’re not just printing – you’re bringing your creative vision to life. Let’s make something amazing together!
Read Our Reviews
See what other authors are saying about working with PufferPrint.

I worked with PufferPrint to publish my children’s board book and they did a fantastic job. I was really appreciative of their communicativeness and professionalism. I felt like they were truly working WITH me, and were invested in making my book as high of a quality as I wanted it to be. Will be recommending them and hopefully working with them again in the future!
Jes McCutchen
Lil’ Space Explorer
PufferPrint is the absolute best for self publishing. The Adventures of Yaya staff is very happy with the decision we made with going through this company. Customer service is second to none and the quality of our children’s book is beyond what we expected. We are looking forward to a long lasting relationship with Pufferprint because they are simply THE BEST!!
Yaya Dayiti
The Adventures of Yaya
PufferPrint guided me through the book printing process and addressed all of my questions promptly. The book looks amazing. I highly recommend PufferPrint!
Janet Beaulieu
Be Brave Little Pirate
I’m so glad I found PufferPrint and I would highly recommend their services. It was a joy to work with such dedicated, prompt and talented customer service. Such meticulous attention to detail, I’m completely satisfied with my book, and PufferPrint. Don’t hesitate, you won’t be disappointed – thanks PufferPrint!
Denise Mathus
Big Potato and Small Fry